
Dual Boot Arch Linux and Windows 10
In this article you can read how to setup a PC that both runs Windows 10 Pro and the latest Arch Linux (Januari 2020). After following this guide you'll have a PC that allows you to select to boot either into Windows 10 or Arch Linux. All you need is a free harddisk a Windows License and preferrably two USB sticks that we use to install the Windows and Arch Linux ISO files onto. We use Windows to create the bootable USB sticks but if you're running Mac, see the links below.
Prerequisites
- PC with ethernet connection.
- A harddisk onto which we install Windows and Arch Linux
- 1x USB stick for Arch Linux
- 1x USB stick for Windows 10.
- A PC that runs Windows.
- We assume you have a UEFI bios.
Create a bootable USB Installer for Arch Linux
You're going to prepare two USB sticks, one will be used for the Arch Linux installer and the other for the Windows 10 Installer. When you don't have two USB sticks you'll have to reuse one; in this case first create this bootable Arch Linux USB stick.
- Download the Arch Linux ISO.
- Select a server nearby your location
- Download the file with a name like
archlinux-2020.01.01-x86_64.iso. - Do not download the the bootstrap version
- Download the Rufus Windows application.
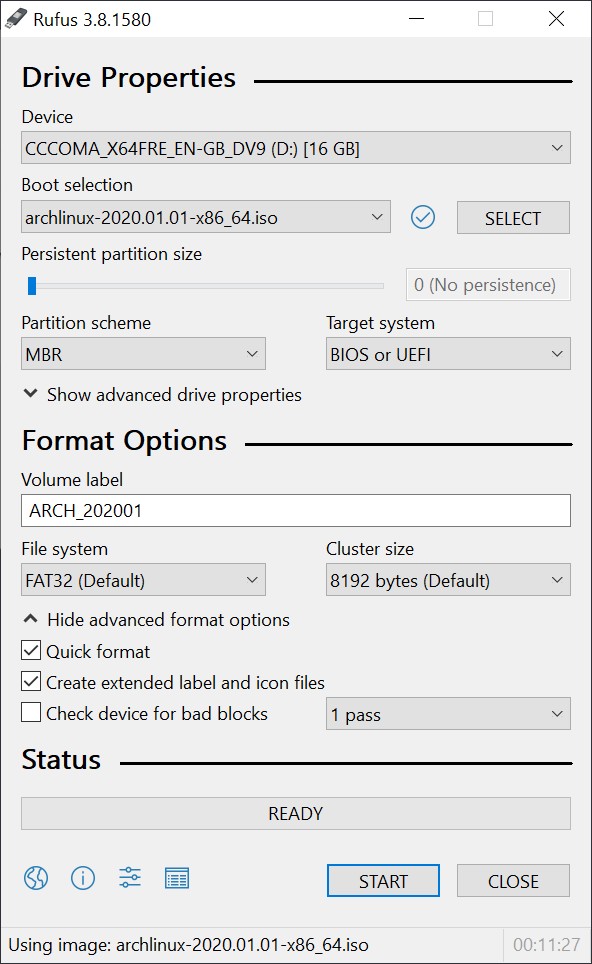
- Run Rufus:
- Device: select your USB stick
- Boot selection: press the SELECT button and brofwse to your arch iso file.
- Partition Scheme: GPT
- Target System: UEFI
- File system: FAT32
- Press START: Select
DD
Create a bootable USB Installer for Windows
To download the Windows 10 Pro ISO we can either use the Windows Media Creation Tool which also creates a bootable USB or trick the Windows website to download the ISO file and use Rufus instead. The Windows Media Creation Tool is known to be buggy and therefore we're going to use Rufus to create a bootable USB stick, just like we did for the Arch Linux bootable USB stick.
By default when you try open the download page for the Windows 10 ISO, the Microsoft website forces you to use the Windows Media Creation Tool; at least when you're using Windows to download the ISO. Luckily we can trick the website to pretend we're visiting the website from a Mac. When the Microsoft website thinks we're using a Mac it magically allows us to download the ISO.
- Use the Chrome browser and search for "Windows 10 Pro ISO"
- Open the link to something like: https://www.microsoft.com/software-download/windows10ISO
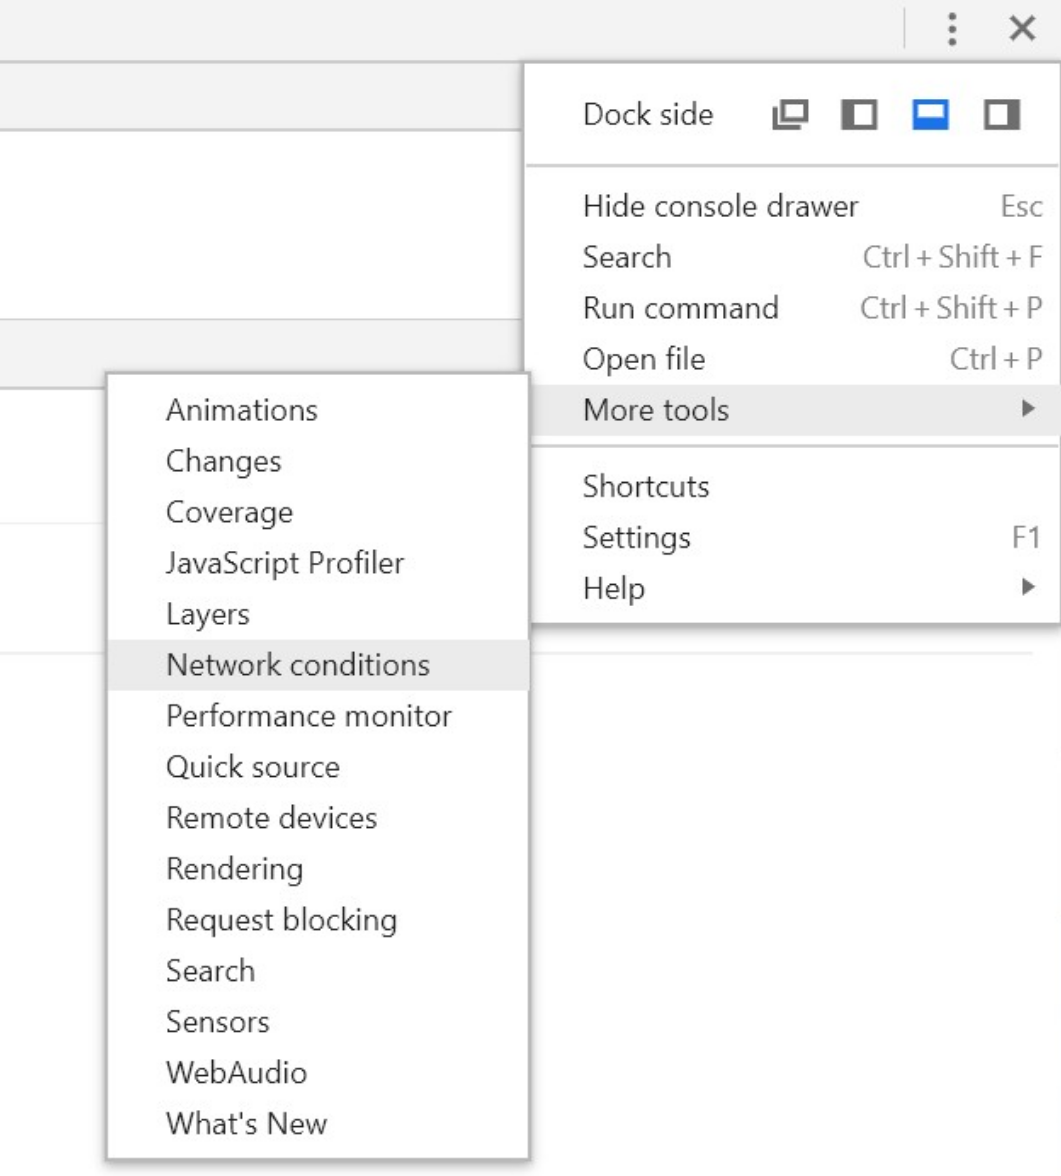
- Press
CTRL+SHIFT+Ito open the Developers Tools - Click the menu icon (3 dots) on the right of the Developer Tools
- Select More tools > Network Conditions
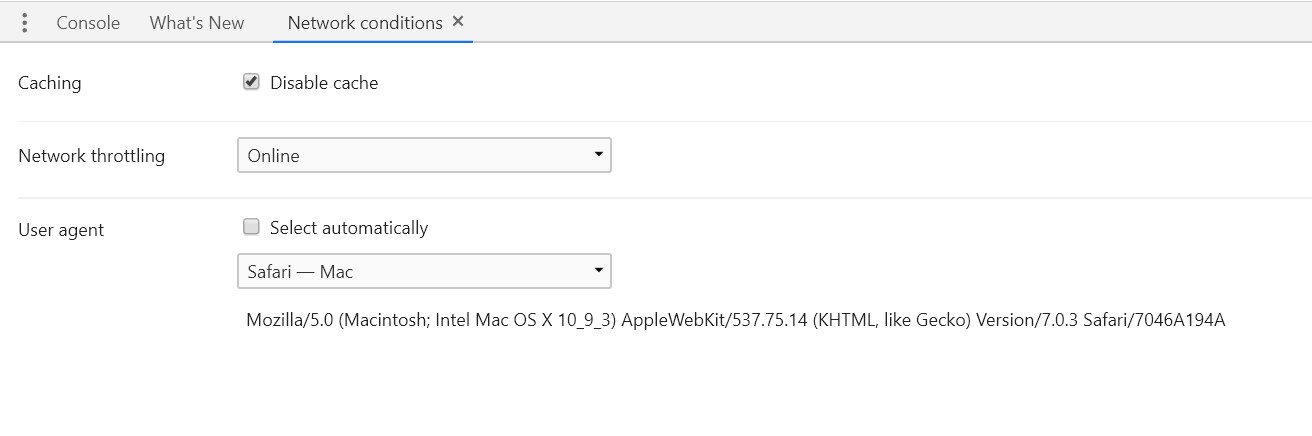
- Unselect the User agent [x] Select automatically setting.
- Select Safari -- Mac
- Reload the page.
- Select Windows 10, press Confirm
- Select your language
- Select the 64-bit download
 Open the network conditions via the Chrome Developer Tools
 Select Safari on Mac as your user agent
Once you've downloaded the Windows 10 Pro ISO, open Rufus again and place the USB stick in your PC. Note that all data on this stick will be removed when we copy the Windows 10 Pro Installer onto this bootable USB stick.
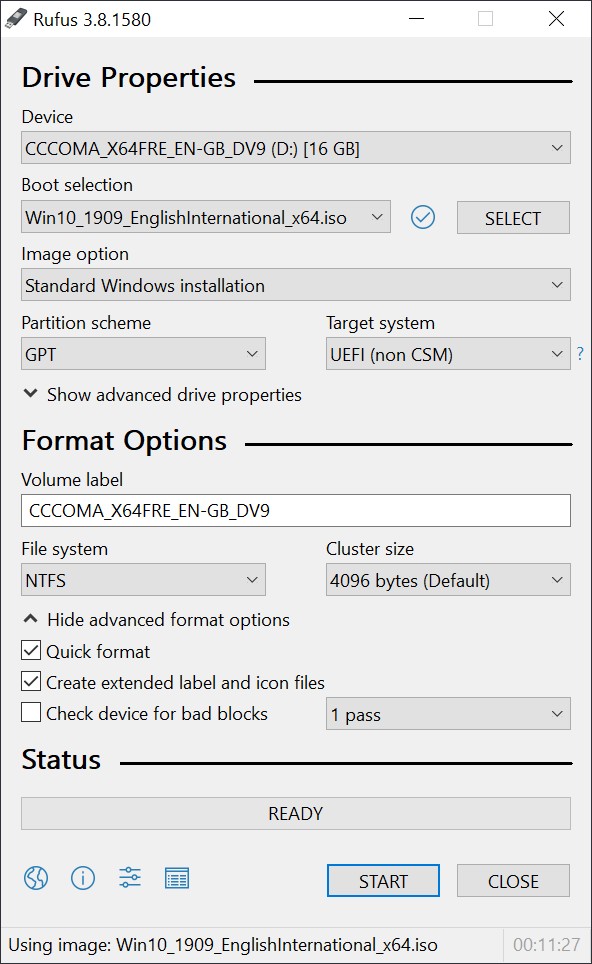
- Run Rufus
- Device: select your USB stick
- Bool selection: press SELECT and browse to your Windows ISO file.
- Partition Scheme: GPT
- Target System: UEFI
- File System: NTFS
- Press START
Install Arch Linux
Now that you have a bootable Arch Linux USB installer and a bootable Windows 10 Pro USB installer you'll have to install Arch Linux first. This means that you have to start with the most important step first: partitioning.
Partitioning is known to be difficult when you're new to Linux. Though let me tell you that it's a lot easier than you think. What might be a bit difficult is to choose the sizes of your partitions. I'll describe what I normally use and you can follow along or choose your own partitions sizes.
I do assume that you've got one harddisk onto which you want to install both Arch Linux and Windows 10 Pro. I use a 2TB SSD disk where I choose 1TB for Arch Linux and 1TB for Windows.
When you've got more than one harddisk and you want to use another harddisk to install Arch Linux and Windows 10 you have to make sure that your UEFI bios boots from the harddisk onto which we're going to install Arch Linux and Windows.
Boot from the Arch Linux USB
- Put your USB stick with the Arch Linux installer into your PC
- Boot from USB
- Select
Arch Linux archiso x86_64 UEFI CD, press Enter
When your screen turns crazy after you have pressed Enter, reboot and follow these steps instead:
- Boot from from USB
- Select "Arch Linux archiso x86_64 UEFI CD", press e
- Scroll to the end of the command and add
nomodeset - Press enter.

Partitioning your harddisk
To find your harddisk we use fdisk. You might have multiple
harddisks and at this point it doesn't really matter which one
you use; this is up to you.
# fdisk -l
You'll see a similar output as below. The Disk /dev/sdb is what
we're after. We'll use the /dev/sdb disk to install Arch Linux
and Windows. Note that my PC came pre-installed with Windows 10
Pro which uses a digital license. This means my motherboard has
the license baked into it and it's safe to remove the existing
partitions. When you don't have a digital license make sure you
have a copy of your Windows 10 License Key.
You'll create three partitions. The boot partition, the root Arch Linux partition and one that the Windows installer will use to install Windows 10. I recommend writing the partitions numbers, sizes and types down as you might want to refer to these when installing Windows 10.
# fdisk -l

Disk /dev/sdb: 3.65 TiB, 4000787030016 bytes, 7814037168 sectors
Disk model: Samsung SSD 860
Units: sectors of 1 * 512 = 512 bytes
Sector size (logical/physical): 512 bytes / 512 bytes
I/O size (minimum/optimal): 512 bytes / 512 bytes
Disklabel type: gpt
Disk identifier: E413F59B-D9CB-4E10-A358-C5E7309DF4D9

Device          Start        End    Sectors  Size Type
/dev/sdb1        2048     526335     524288  256M EFI System
/dev/sdb2      526336 4295493631 4294967296    2T Linux filesystem
/dev/sdb3  4295493632 7814037134 3518543503  1.7T Microsoft basic data
Now that you know the disk name, you can run gdisk to partition your
disk. First we'll remove all the existing partitions.
# gdisk /dev/sdb
Remove exiting partitions:
- Press `d`
- Partition number (1-2): 1 [PRESS ENTER]
- Press `d`
- Repeat for all your paritions.
Create the boot and main partion for Arch Linux:
- Press `n`
- Partition number: 1
- First sector: [PRESS ENTER]
- Last sector: +256M
- Hex code or GUID: ef00

- Press `n`
- Partition number: 2
- First sector: [PRESS ENTER]
- Last sector: 1T
- Hex code or GUID: 8300
Create the Windows Partition:
- Press `n`
- Partition number: 3
- First sector: [PRESS ENTER]
- Last sector: [PRESS ENTER}
- Hex code or GUID: 0700
Save and exit.
- Press `w`
- Do you want to proced: `y`
Lets see the created partitions:
# fdisk -l /dev/sdb

Disk /dev/sdb: 3.65 TiB, 4000787030016 bytes, 7814037168 sectors
Disk model: Samsung SSD 860
Units: sectors of 1 * 512 = 512 bytes
Sector size (logical/physical): 512 bytes / 512 bytes
I/O size (minimum/optimal): 512 bytes / 512 bytes
Disklabel type: gpt
Disk identifier: E413F59B-D9CB-4E10-A358-C5E7309DF4D9

Device          Start        End    Sectors  Size Type
/dev/sdb1        2048     526335     524288  256M EFI System
/dev/sdb2      526336 4295493631 4294967296    2T Linux filesystem
/dev/sdb3  4295493632 7814037134 3518543503  1.7T Microsoft basic data
Format the partitions:
# mkfs -t vfat /dev/sdb1
# mkfs -t ext4 /dev/sdb2
Setup and install Arch Linux base system
Mount system: you first mount the main system (/dev/sdb2) after which you
mount the boot partition (/dev/sdb1).
# mkdir /mnt
# mount /dev/sdb2 /mnt

# mkdir /mnt/boot
# mount /dev/sdb1 /mnt/boot
Setup base system:
# pacstrap /mnt base base-devel linux linux-firmware
# genfstab -U -p /mnt >> /mnt/etc/fstab
# arch-chroot /mnt
Install some core utilities:
# pacman -S emacs
# pacman -S git
# pacman -S kitty
# pacman -S dhcpcd
# pacman -S openssh
Configure timezone
# ln -sf /usr/share/zoneinfo/Europe/Amsterdam /etc/localtime
# hwclock --systohc

# emacs -nw /etc/locale.gen
-- uncomment: en_US.UTF-8 UTF-8

# locale-gen
# localectl set-locale LANG=en_US.UTF-8

# emacs -nw /etc/locale.conf
-- add the following lines:
LANG=en_US.UTF-8
LC_CTYPE=en_US.UTF-8
Hostname
# emacs -nw /etc/hostname
-- set your hostname, e.g. roxlu, arch, etc.)
Host file
# emacs -nw /etc/hosts

-- make sure it reads something like:
127.0.0.1 localhost
::1 localhost
127.0.1.1 yourhostname.localdomain yourhostname
Add your main account:
# useradd -m -g users -s /bin/bash roxlu
# gpasswd -a roxlu wheel
# passwd roxlu
Set root password:
# passwd
Install the rEFInd boot loader
I've been using the rEFInd boot loader for quite a while and have been very happy with it; I like that it's a graphical menu that you can customise. So let's install the rEFInd boot loader.
# pacman -S refind-efi
# refind-install
The refind-install util will copy some required files to the
boot partition for you but we still have to configure rEFInd to
make sure that it loads the correct files when booting. You have
to set the correct UUID in the /boot/refind_linux.conf.
We have to get the UUID of our root partition (not boot). You can use the following command to get the UUID for the root partition:
# findmnt -no UUID /
3d72956e-db77-43b4-b299-14a0de20ea4c
To copy the UUID easily I'm using emacs that I use to create a
split window. In the right window I run M-x eshell in which I
execute findmnt -no UUID / and copy the UUID. In the left pane
I opened the /boot/refind_linux.conf. Now make sure that it reads
something similar as this:
# emacs -nw /boot/refind_linux.conf

-- create a split window
-- M-x eshell, and run `blkid /dev/sdb2` in
-- copy the UUID into `refind_linux.conf` so that it looks like:

"Boot with standard options"  "rw root=UUID=3d72956e-db77-43b4-b299-14a0de20ea4c"
"Boot to single-user mode"    "rw root=UUID=3d72956e-db77-43b4-b299-14a0de20ea4c single"
"Boot with minimal options"   "rw root=UUID=3d72956e-db77-43b4-b299-14a0de20ea4c"
Now verify that your boot partition is setup correctly. It should look similar to this listing:
# cd /boot
# ls -1

EFI
initramfs-linux-fallback.img
initramfs-linux.img
refind_linux.conf
vmlinuz-linux
When you're missing the kernel executable vmlinuz-linux or
any of the initramfs-* something went wrong. Try to reinstall
the kernel using:
# pacman -S linux
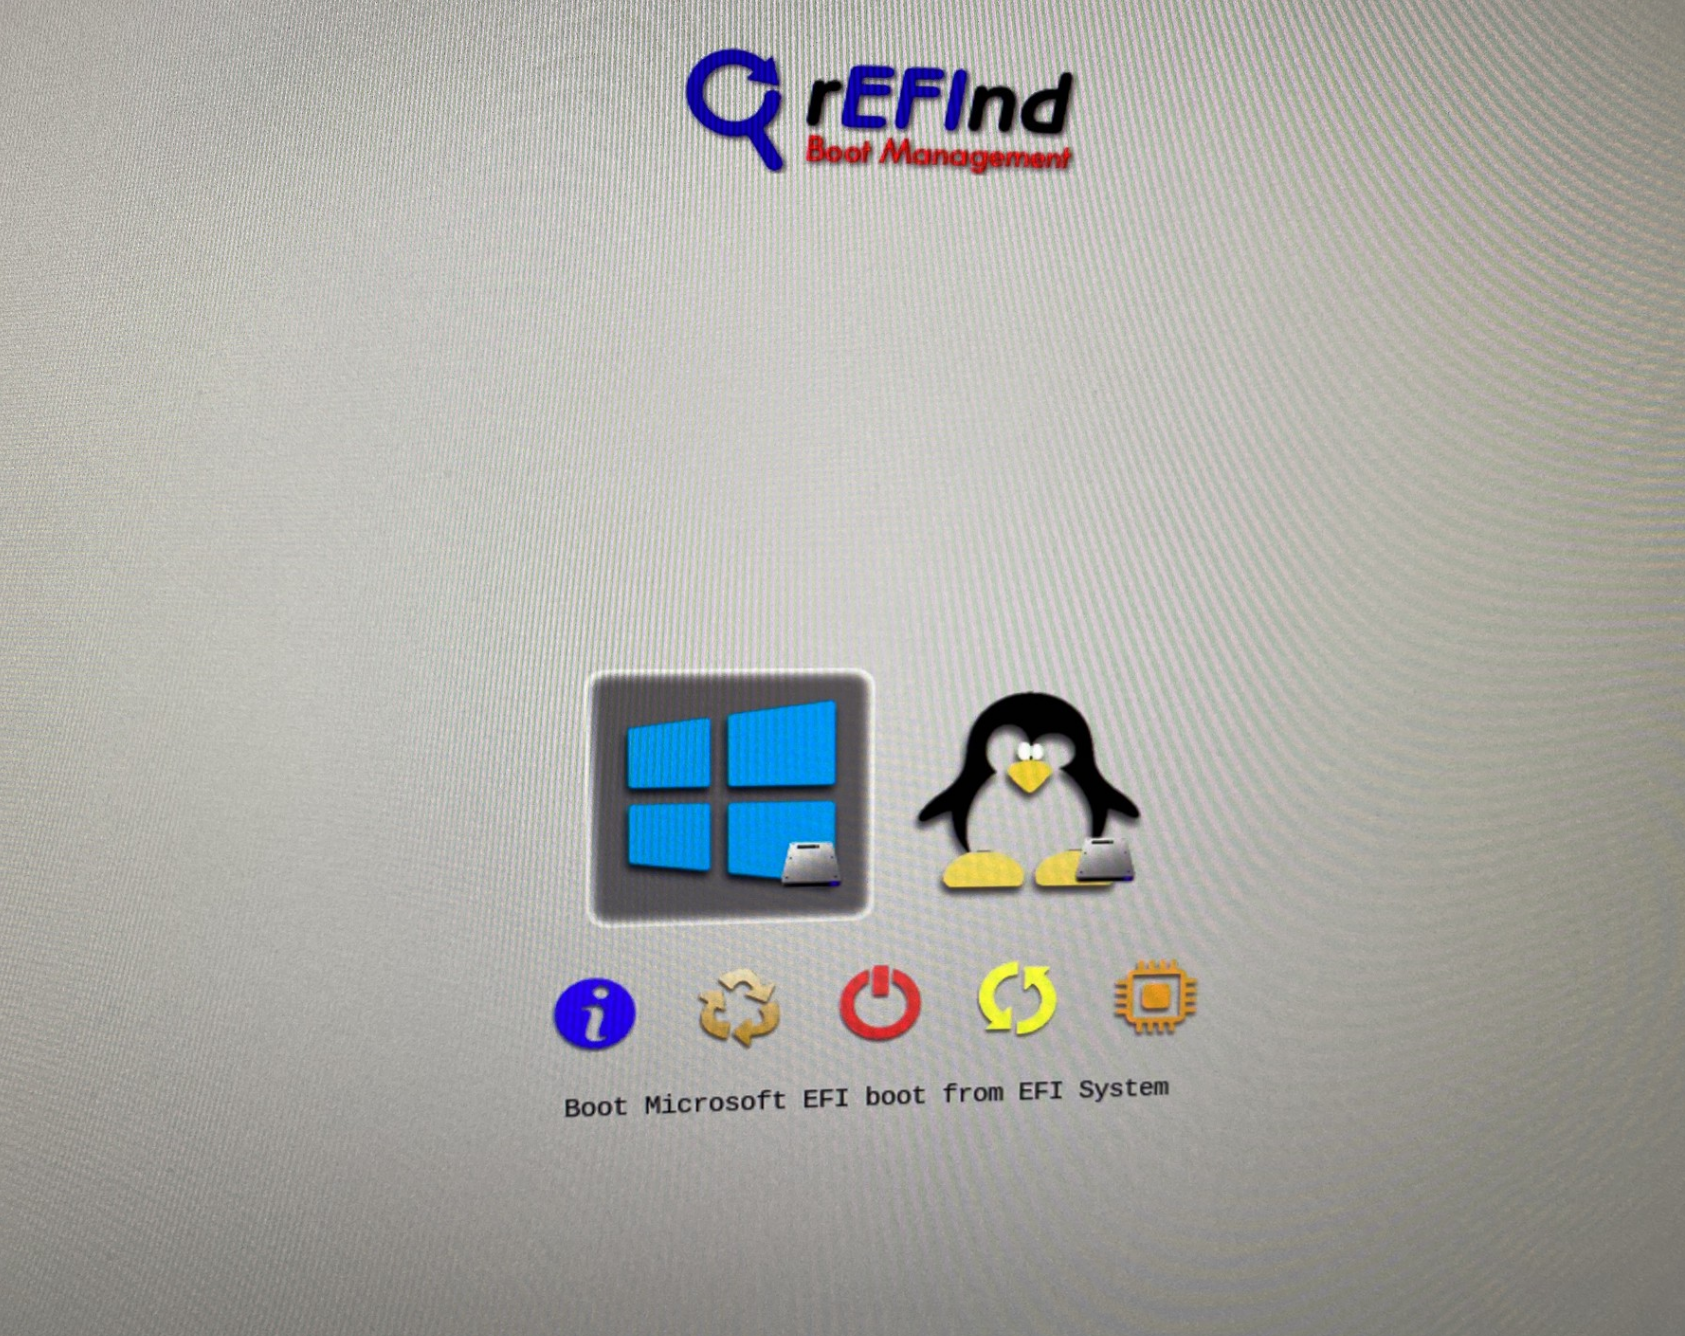
When you reboot now, you'll get a similar menu as in the image above, but you'll see only the Linux menu option, we're going to add Windows later.
Setup networking using DHCP
I'm using DHCP to automatically configure my network. When you
don't use DHCP you can set your IP manually but that's out of the
scope of this document. To enable DHCP for a network interface, we'll
check which one is currently in use. To do this we use the ip addr
command. Find the interface that you want to setup; this is most likely
the one which comes directly after the link/loopback interface with
a link designation like link/ether
 # ip addr

 3: eno1: <BROADCAST,MULTICAST,UP,LOWER_UP> mtu 1500 qdisc fq_codel state UP group default qlen 1000
    link/ether 00:d8:61:4f:ba:df brd ff:ff:ff:ff:ff:ff
    inet 192.168.0.178/24 brd 192.168.0.255 scope global noprefixroute eno1
       valid_lft forever preferred_lft forever
    inet6 fe80::5c2d:3270:4:9ca8/64 scope link
       valid_lft forever preferred_lft forever
In the example above, the name of our network interface is
eno1. Now, that you know the name of the network interface we
can enable DHCP on it. Note that below we use dhcpcd and
not dhcp.
# systemctl enable dhcpcd@eno1
Reboot
Remove the USB stick and exit the chroot environment, then
execute reboot. When your PC restarts you should see the rEFInd
boot menu that you need to start Linux.
# exit
# reboot
When you don't get the rEFInd menu something went wrong. See the next section which allows you to go back into your just installed Arch Linux. When you do get the rEFInd boot menu: congrats, you just installed Arch Linux successfully. Skip the next step and continue with the Windows 10 Pro install.
Fixing errors when your boot menu is broken
Don't worry, you don't have to reinstall everything again. When you don't see the rEFInd boot menu after restarting you either made an error while configuring rEFInd or creating the partitions. When your partitions are incorrect, you might have to reinstall Arch Linux again. When it's something related to rEFInd, you might be able to fix it by checking your configs again.
Here I'll explain how you can go back into your just installed Arch Linux so you're able to verify some things and check the rEFInd configuration.
- Put the Arch Linux bootable USB installer in your PC.
- Boot from the Arch Linux USB (see above how to do this).
Mount your installed Arch Linux and chroot into it. Make sure to use the correct partitions that you used when partitioning your filesystem.
  # mount /dev/sdb2 /mnt
  # mount /dev/sdb1 /mnt/boot
  # arch-chroot /mnt
Now you're back into your install and you can fix it!
Install Windows 10 Pro
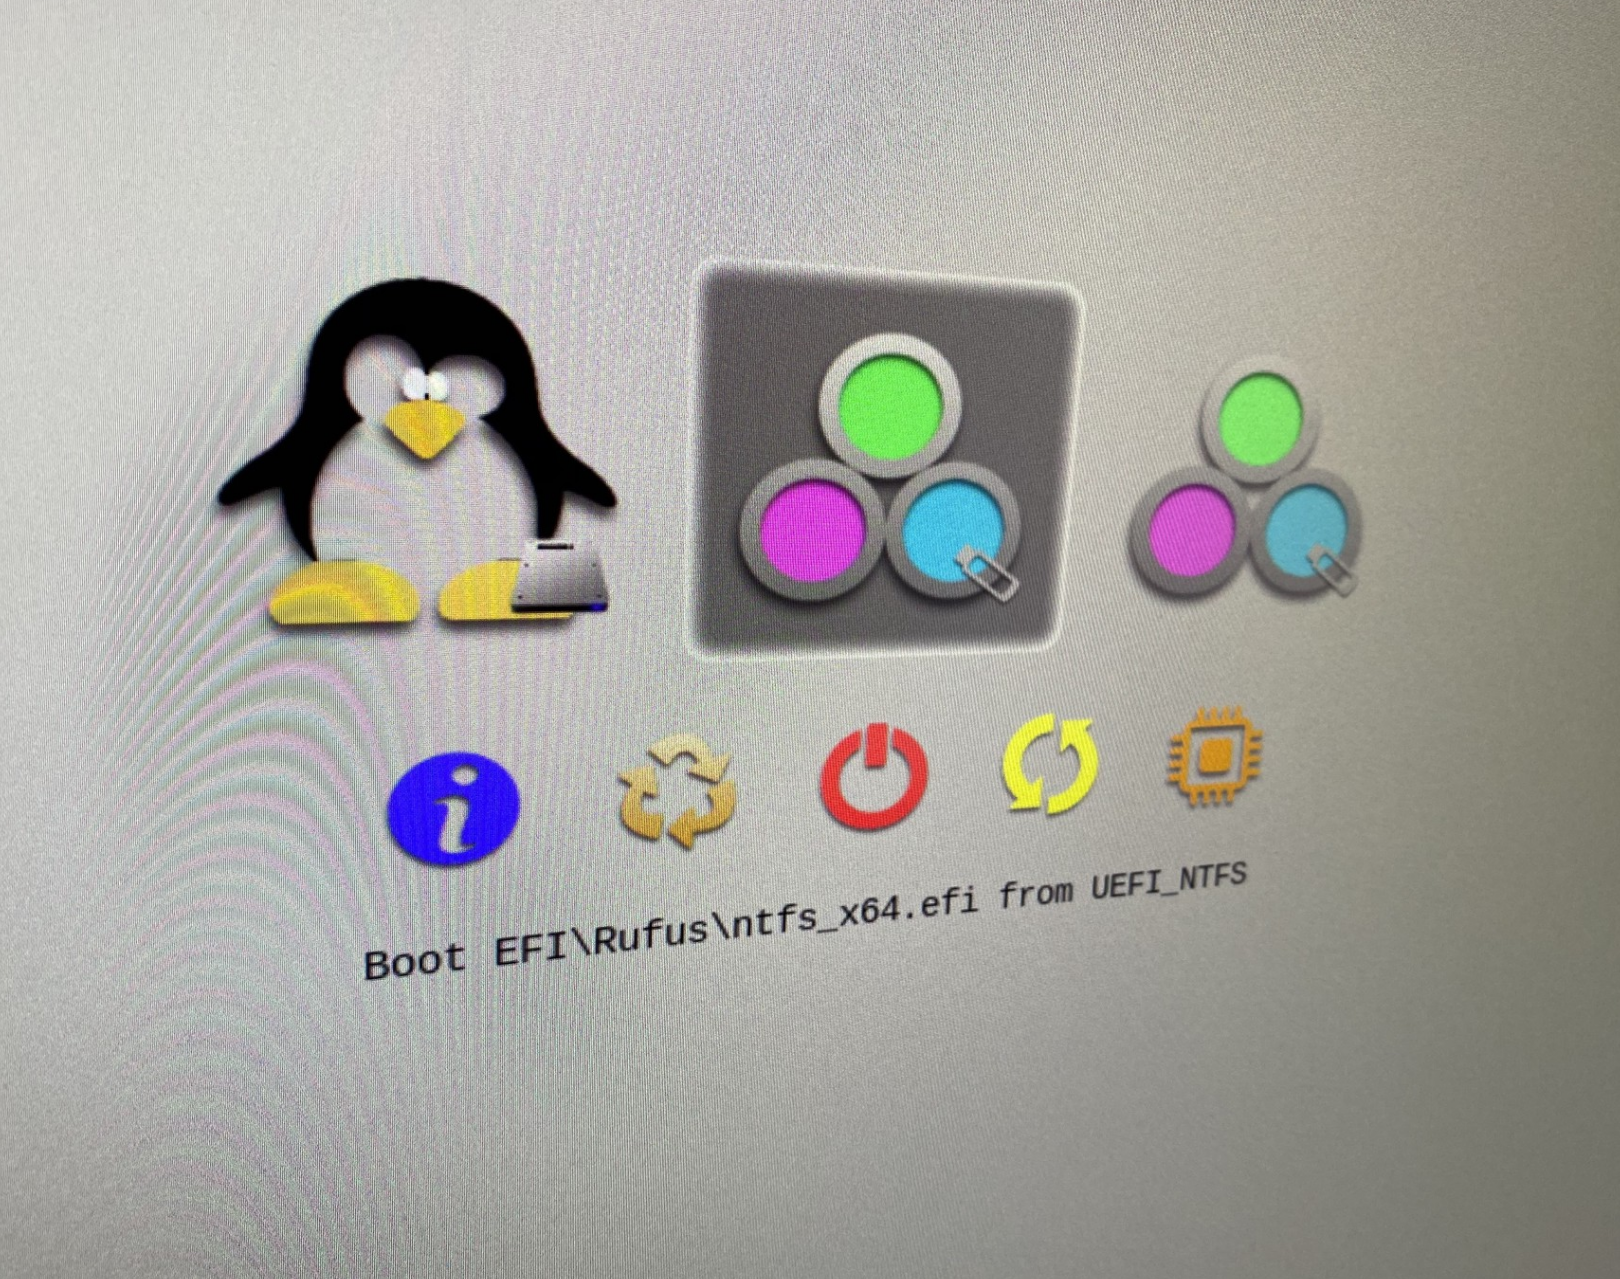
At this point you should be able to access the rEFInd boot menu when you boot your PC. Now you instert the bootable Windows 10 Pro USB stick into your PC, remove the Arch Linux installer USB and reboot. After the reboot, rEFInd will show you a couple of extra options. I got two extra options for the Windows installer. I selected the menu option with Boot EFI\Rufus\ntfs_x64.efi from UEFI_NTFS
Installing Windows 10 is a pretty trivial and straightforward process. The only thing which might be worth mentioning is the partitioning step. When the installer starts, one of the first screens will ask if you want to repair an existing installation or do a advanced full install. Choose the advanced option and when you're asked to select the partition make sure to select the one that you prepared when partitioning for Arch Linux.
Select the correct partition, press Next and follow the screens from the installer. Once Windows has been installed remove the USB key and restart. rEFInd will contain an extra option for Windows 10 Pro.
Windows removed rEFInd: how to reinstall rEFInd?
It might happen that the Windows installer removed the rEFInd boot menu and forced it's own boot manager to be the default one. This means that when we reboot we won't get the rEFInd boot menu anymore. You can fix this issue by reinstalling rEFInd.
- First boot into your Arch Linux installation as described above in the Boot from the Arch Linux USB.
- Next run
refind-installagain - Remove the USB stick
- Reboot
This should bring back the rEFInd boot menu and it will have two options now, one for Windows 10 Pro and one for Arch Linux. Congratulations you have successfully installed Arch Linux and Windows 10 Pro as a dual boot on your PC with the rEFInd boot menu.
Now that you've got a nice setup, you might want to create a self-hosted Unifi NVR
 NAT Types
 Building Cabinets
 Compiling GStreamer from source on Windows
 Debugging CMake Issues
 Dual Boot Arch Linux and Windows 10
 Mindset Updated Edition, Carol S. Dweck (Book Notes)
 How to setup a self-hosted Unifi NVR with Arch Linux
 Blender 2.8 How to use Transparent Textures
 Compiling FFmpeg with X264 on Windows 10 using MSVC
 Blender 2.8 OpenGL Buffer Exporter
 Blender 2.8 Baking lightmaps
 Blender 2.8 Tips and Tricks
 Setting up a Bluetooth Headset on Arch Linux
 Compiling x264 on Windows with MSVC
 C/C++ Snippets
 Reading Chunks from a Buffer
 Handy Bash Commands
 Building a zero copy parser
 Kalman Filter
 Saving pixel data using libpng
 Compile Apache, PHP and MySQL on Mac 10.10
 Fast Pixel Transfers with Pixel Buffer Objects
 High Resolution Timer function in C/C++
 Rendering text with Pango, Cairo and Freetype
 Fast OpenGL blur shader
 Spherical Environment Mapping with OpenGL
 Using OpenSSL with memory BIOs
 Attributeless Vertex Shader with OpenGL
 Circular Image Selector
 Decoding H264 and YUV420P playback
 Fast Fourier Transform
 OpenGL Rim Shader
 Rendering The Depth Buffer
 Delaunay Triangulation
 RapidXML
 Git Snippets
 Basic Shading With OpenGL
 Open Source Libraries For Creative Coding
 Bouncing particle effect
 OpenGL Instanced Rendering
 Mapping a texture on a disc
 Download HTML page using CURL
 Height Field Simulation on GPU
 OpenCV
 Some notes on OpenGL
 Math
Math
 Gists to remember
 Reverse SSH
 Working Set
 Consumer + Producer model with libuv
 Parsing binary data
 C++ file operation snippets
 Importance of blur with image gradients
 Real-time oil painting with openGL
 x264 encoder
 Generative helix with openGL
 Mini test with vector field
 Protractor gesture recognizer
 Hair simulation
 Some glitch screenshots
 Working on video installation
 Generative meshes
 Converting video/audio using avconv
 Auto start terminal app on mac
 Export blender object to simple file format